1. Introduction and objectives
The hub-and-spoke topology is the most common network pattern in Azure landing zones. A central hub VNet hosts shared services (firewall, VPN/ExpressRoute gateway, Bastion, DNS), and isolated spoke VNets host workloads. The spokes peer only with the hub, never with each other, so every flow between spokes, to the internet, or from on-premises has to pass through a point you control.
In this lab we put Azure Firewall in the hub and force spoke traffic through it. The objectives are:
- Segment the network into a hub and two spokes Vnet.
- Deploy the VNets and VMs (virtual machine) trough ARM templates.
- Deploy azure firewall, configure Vnet peering and route spoke traffic to the firewall with UDR (User defined route).
- Verify spoke subnet routing with Effective routes and Network Watcher Next hop.
- Write firewall policy: DNAT, Network and Application rules.
- Test inbound RDP/SSH connection from the internet and inter-VNet connectivity.
2. VNet segmentation
Some rules for the design:
- Address spaces must not overlap, or peering will fail.
- The firewall subnet must be named exactly AzureFirewallSubnet and be at least /26. In addition a second subnet is required for the firewall management (AzureFirewallManagementSubnet)
- Give each spoke its own VNet for strong isolation (per team, environment or application). Use subnets inside a spoke for tiers such as web, app and data.
- The firewall will get the first usable address in its subnet, 10.0.0.4. We use that as the next hop.
| VNet | Address space | Subnets | Role |
|---|---|---|---|
vnet-hub | 10.0.0.0/16 | AzureFirewallSubnet 10.0.0.0/26 AzureFirewallManagementSubnet10.0.1.0/26 | Shared services, firewall |
vnet-spoke1 | 10.1.0.0/16 | SubnetSpoke1 10.1.0.0/24 | Windows VM (client) |
vnet-spoke2 | 10.2.0.0/16 | SubnetSpoke2 10.2.0.0/24 | Linux VM (web server) |
3. Lab topology
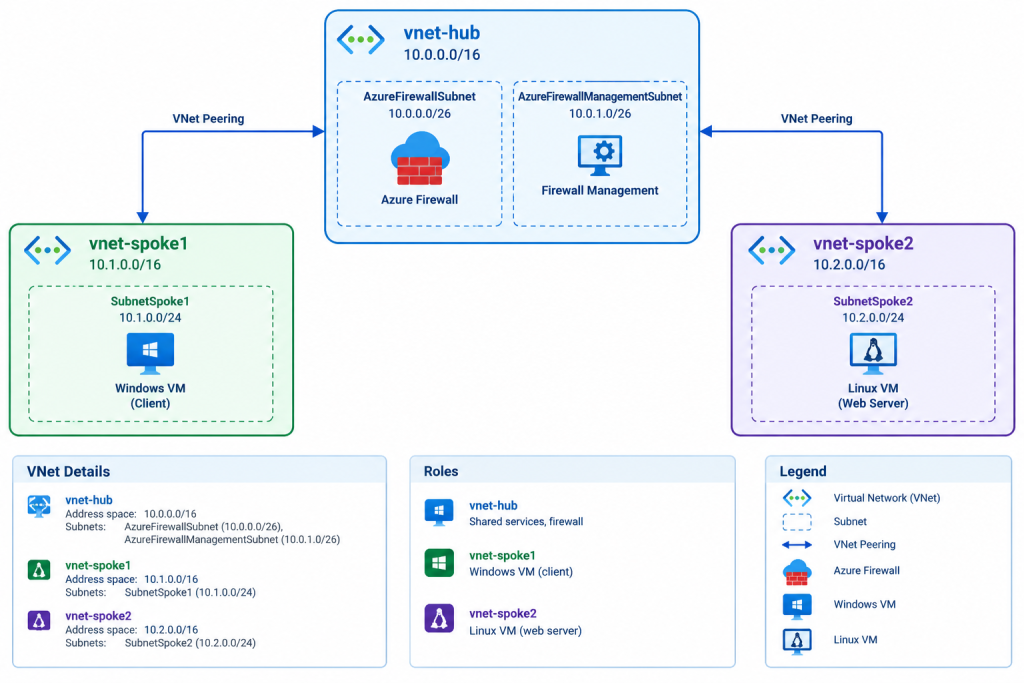
Please take in mind that Peering is not transitive. Spoke1 and spoke2 cannot reach each other through the hub on their own. Traffic will flows only because a UDR (User Defined Route) sends it to the firewall, which then routes it onward via the peering to the other spoke.
4. Deploy lab core infrastructure
We use ARM templates for the virtual networks and the two VMs, and leave peering, firewall and routes for the Portal so the moving parts stay visible.
4.1 Create the Lab resource group
Login into your azure subscription from windows powershell:
Connect-AzAccount
This command opens a browser window for authentication. Sign in with your Azure credentials. After successful authentication, you’ll see your subscription details in Power Shell
Once logged in your Azure subscription, you can create the required resource group that will contain the three Vnets:
New-AzResourceGroup -Name AZ700labHubSpokes -Location "westeurope"
4.2 Deploy Vnets and VMs on his respective subnet
You can download the json files (template and parameters) that you need for the Vnet and the VMs:
https://github.com/az104tor/azure-arm-hub-spoke.git
*Replace the placeholder values in the VM example parameter file with values appropriate for your Azure environment.
Place the files in a directory on your local system. Move to the local directory who you placed the templates.
Deploy Vnets:
New-AzResourceGroupDeployment -name deplHSvnets -ResourceGroupName AZ700labHubSpokes -TemplateFile .\template.json -TemplateParameterFile .\parameters.json
Deploy linux-vm:
New-AzResourceGroupDeployment -name deplvm1 -ResourceGroupName AZ700labHubSpokes -TemplateFile linux-vm.json -TemplateParameterFile .\linux-vm.parameters.example.json
Deploy windows-vm:
New-AzResourceGroupDeployment -name deplvm2 -ResourceGroupName AZ700labHubSpokes -TemplateFile windows-vm.json -TemplateParameterFile .\windows-vm.parameters.example.json
4.4 Connect to both VM from your local/on-premises system
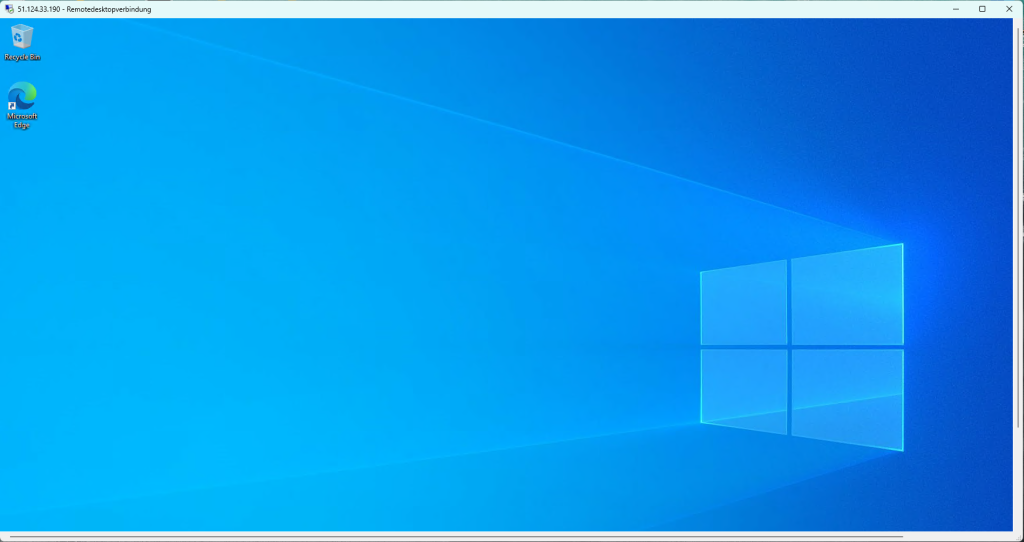
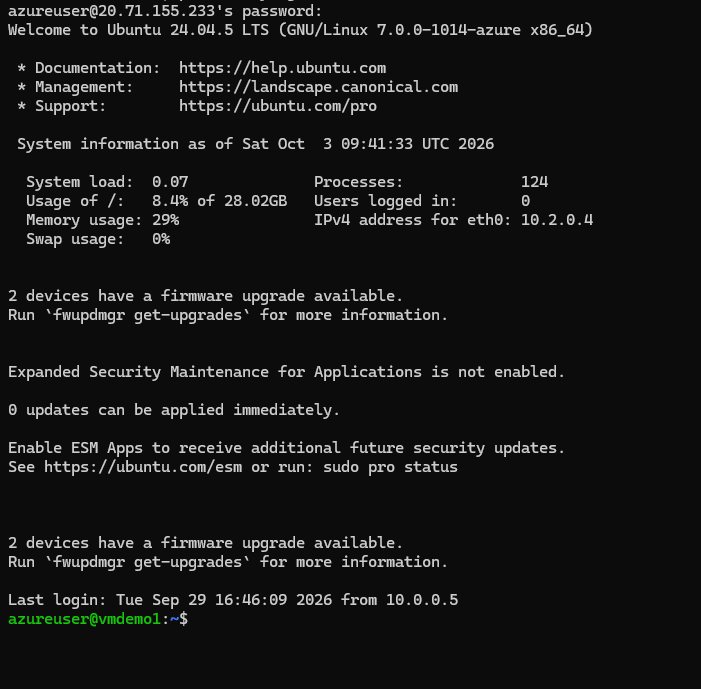
VMs are now up and running on your Azure subscription. Both virtual machines will be accessible from the Internet trough its own public IP address resource (configured as dependency resource in the arm parameters):

vmclient over RDP:
Linuxserver over ssh:
Here you can proceed to install a web server (apache in my case) and personalize the index.html file (you find an file example on my git repository above).
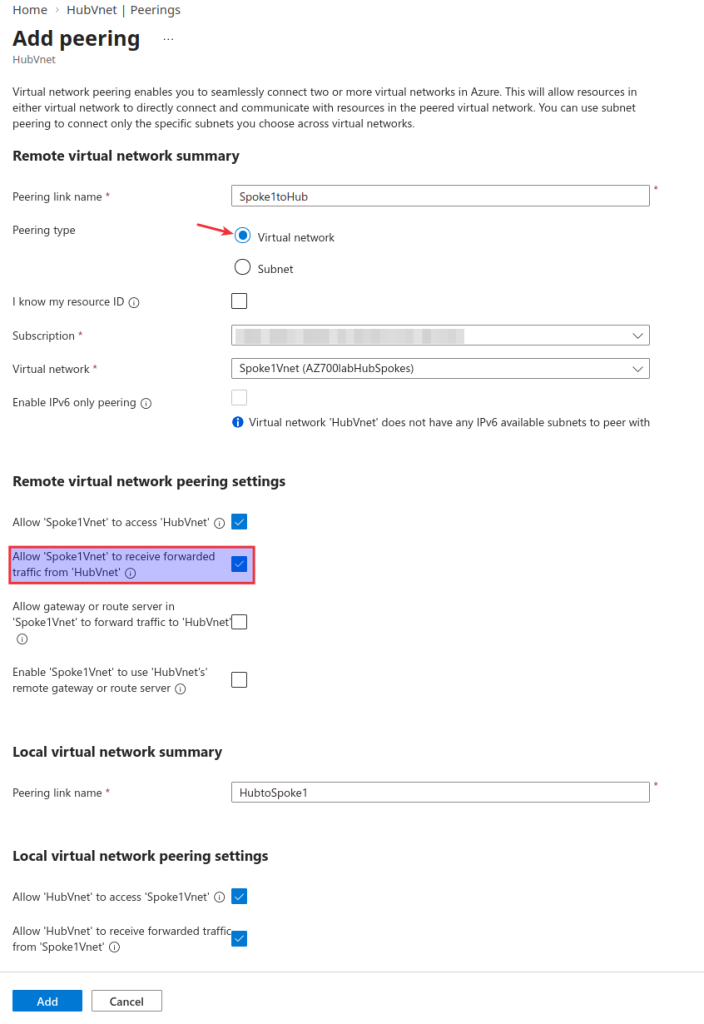
4.5 Create VNet peerings between the Hub Vnet and the Spokes
Azure Virtual Network peering allows two VNets to communicate directly through the Microsoft backbone infrastructure without requiring VPN gateways or public internet routing.
For each spoke, go to Virtual networks → vnet-hub → Peerings → Add and create a two-way peering:
- Hub → spoke1 and spoke1 → hub
- Hub → spoke2 and spoke2 → hub
Important settings:
- Allow traffic to remote virtual network: Enabled
- Allow traffic forwarded from the remote virtual network: Enabled. This is essential, because the firewall forwards packets that did not originate in the hub.
The Portal creates both directions in one step when you use the “Add” wizard from the hub.
Once the peering is created, azure SDN (software defined networking) will inject new system routes (Spoke1 >>> Hub) to the effective route table of every network interface (NIC) in the involved subnets:
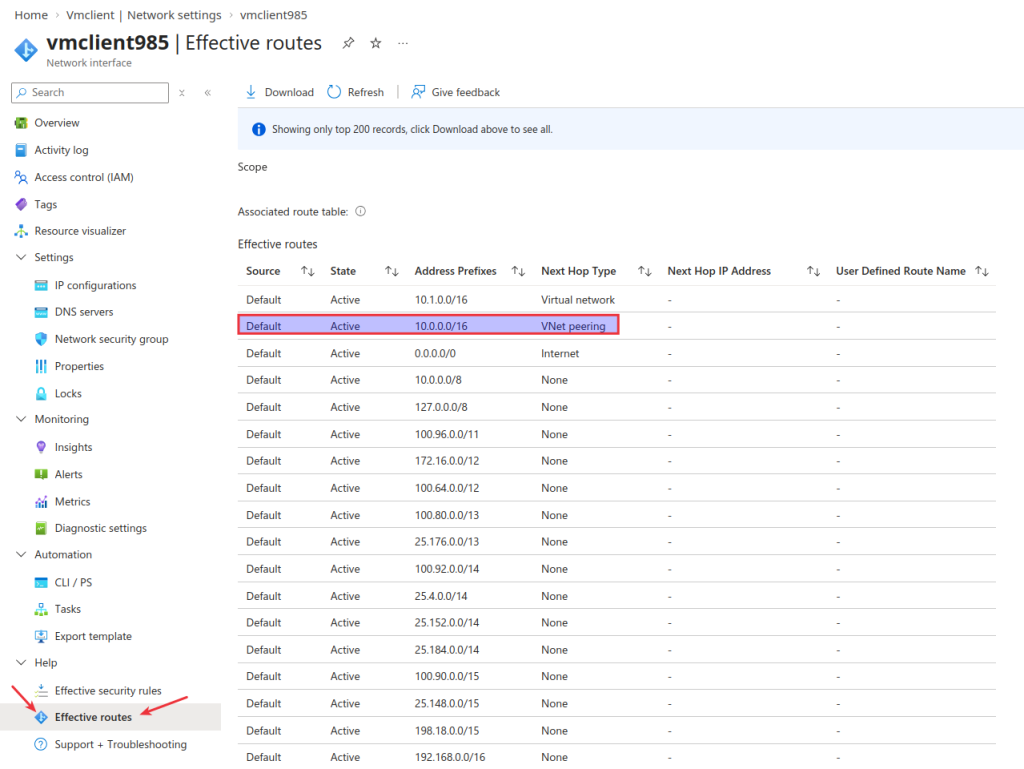
We will rewrite the system route later (User defined route), to forward inter spoke and internet traffic directly to the Firewall appliance for inspection.
5. Deploy Azure Firewall from Azure Portal
In this lab we deploy the firewall from the Portal using the Basic SKU, which is the cheapest option and has everything we need for DNAT, network and application rules.
Prerequisite: the two firewall subnets
Basic SKU firewalls always use a Management NIC, so the hub VNet needs two dedicated subnets:
| Subnet | Prefix | Purpose |
|---|---|---|
AzureFirewallSubnet | 10.0.1.0/26 | Customer traffic (already created by the ARM template) |
AzureFirewallManagementSubnet | 10.0.2.0/26 | Management traffic used by the Azure platform only |
Create the firewall
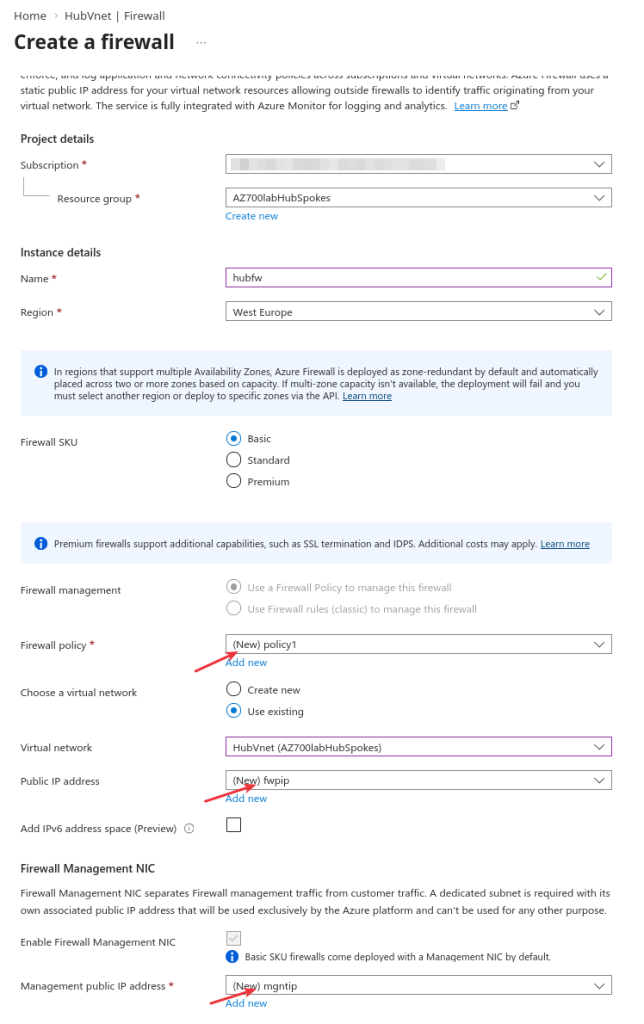
Go to Create a resource → Firewall (or HubVnet → Firewall) and fill in the form as follows.
Project details
- Subscription: your lab subscription
- Resource group:
AZ700labHubSpokes
Instance details
- Name:
hubfw - Region:
West Europe. It must be the same region as the VNet. - Firewall SKU: Basic. Standard and Premium add features such as TLS inspection and IDPS (Premium), but cost more and are not needed here.
- Firewall management: Use a Firewall Policy to manage this firewall. This is the only choice for Basic and is the recommended approach anyway.
Firewall policy (first red arrow)
- Click the drop-down and keep the suggested (New)
policy1, or use Add new to give it your own name. The policy tier follows the SKU, so it is created as a Basic policy. All DNAT, network and application rules will be defined in this policy later.
Networking
- Choose a virtual network: Use existing
- Virtual network:
HubVnet (AZ700labHubSpokes). The portal picks upAzureFirewallSubnetautomatically. - Public IP address (second red arrow): (New)
fwpip. This is the address you will use as the destination in the DNAT rules and in your RDP/SSH clients.
Firewall Management NIC (third red arrow)
- Enable Firewall Management NIC: checked and greyed out, because Basic SKU firewalls always deploy with a management NIC.
- Management public IP address: (New)
mgntip. This second public IP is used exclusively by the Azure platform to manage the firewall. It cannot carry your traffic and you never use it in rules.
6. Firewall policy: DNAT, Network and Application rules
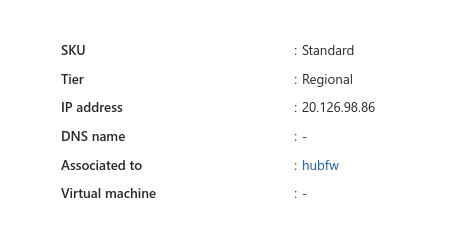
After deployment, open the firewall resource and note:
- the private IP (
10.0.0.4, the first usable address ofAzureFirewallSubnet), which is the next hop for the route tables that we will create later - the public IP
fwpip, which is the destination for the DNAT rules:
The rules for hubfw live in policy1. A policy is organized in Rule Collection Groups, which contain Rule Collections, which contain the rules. The Portal creates three groups by default, and they are processed in a fixed order:
| Order | Rule collection group | Type of rules | Priority used here |
|---|---|---|---|
| 1 | DefaultDnatRuleCollectionGroup | DNAT | 100 |
| 2 | DefaultNetworkRuleCollectionGroup | Network (L3/L4) | 200 |
| 3 | DefaultApplicationRuleCollectionGroup | Application (L7, FQDN) | 300 |
Everything not explicitly allowed is denied. This matters for the last step: once the application rules are in place, the VMs can only reach the Ubuntu and Windows Update destinations on the internet.
6.1 DNAT rules: administrative access to both VMs
A matching DNAT rule implicitly allows the traffic, so you don’t need a separate network rule.
Add a rule collection: Name dnat-admin, Type DNAT, Rule collection group DefaultDnatRuleCollectionGroup, Priority 100.
| Rule name | Source | Protocol | Destination (FW public IP) | Dest. port | Translated address | Translated port |
|---|---|---|---|---|---|---|
rdp-win-client | your public IP | TCP | <FW-PublicIP> | 9989 | 10.1.0.4 | 3389 |
ssh-linux-server | your public IP | TCP | <FW-PublicIP> | 9922 | 10.2.0.4 | 22 |

At this point, you can remove the VM public IP address resource from the VMs.
6.2 Network rules: DNS and inter-spoke traffic
Add a rule collection: Name net-allow, Type Network, Action Allow, Rule collection group DefaultNetworkRuleCollectionGroup, Priority 200.
| Rule name | Source | Protocol | Destination | Dest. port | Purpose |
|---|---|---|---|---|---|
client-to-web | 10.1.0.4 | TCP | 10.2.0.4 | 80 | Windows client reaches the private web server over HTTP |
icmp-spokes (optional) | 10.1.0.0/16 | ICMP | 10.2.0.0/16 | * | Ping tests, useful for troubleshooting |

6.3 Application rules: outbound access limited to Ubuntu and Windows Update
Add a rule collection: Name app-allow, Type Application, Action Allow, Rule collection group DefaultApplicationRuleCollectionGroup, Priority 300.
| Rule name | Source | Protocol | Destination type | Destination |
|---|---|---|---|---|
allow-windows-update | 10.1.0.0/24 | http:80, https:443 | FQDN tag | WindowsUpdate |
allow-ubuntu-repos | 10.2.0.0/24 | http:80, https:443 | FQDN | *.ubuntu.com |
| allow netoncloud website | 10.1.0.0/24 | https:443 | FQDN | netoncloud.com |
- The
WindowsUpdateFQDN tag is maintained by Microsoft and contains all the endpoints Windows Update needs, so you do not have to maintain a list yourself. *.ubuntu.comcoversarchive.ubuntu.com,security.ubuntu.comandazure.archive.ubuntu.com, which is the mirror Azure Ubuntu images use by default. Apt mostly uses plain HTTP on port 80, so keep both protocols.

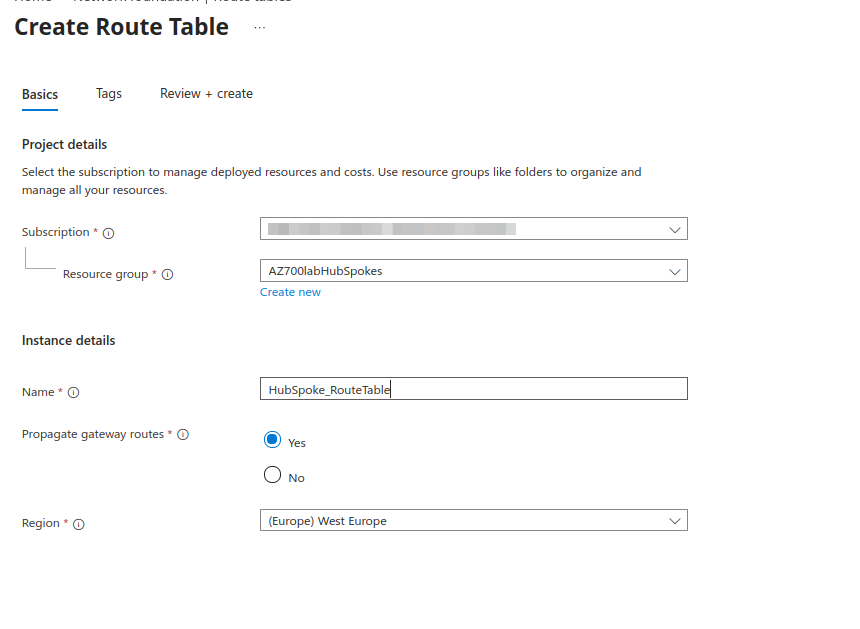
7. Create a Route Table with a default route, and assign it to the spoke subnets
In order to forward any traffic ( both internet and inter spoke communication) to the firewall apliance, we need to create a route table in the same firewall region:
Then, we can add the default route to the firewall inside our new Route Table:
| Name | Address prefix | Next hop type | Next hop address |
|---|---|---|---|
default-to-fw | 0.0.0.0/0 | Virtual appliance | 10.0.0.4 |
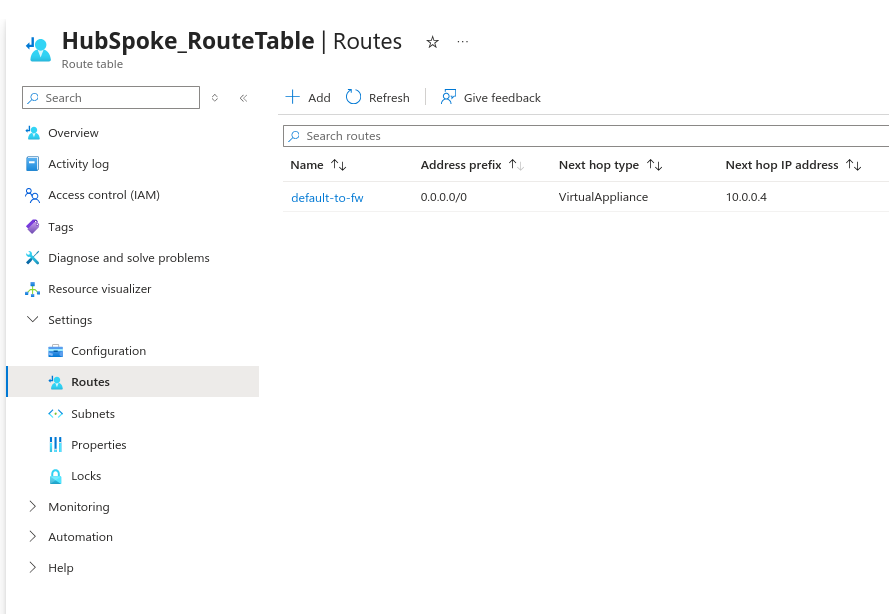
Next, we need to associate the Route Table to the spoke subnets:
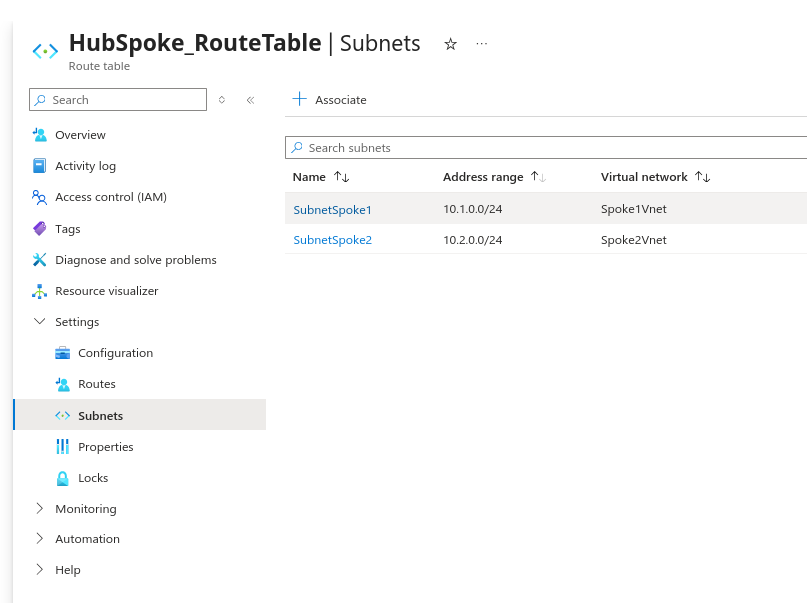
7.1 Verifying: Effective routes
Effective routes in Microsoft Azure are the final, combined set of IP routes applied to a network interface (NIC) on a virtual machine.
VM → Networking → Network settings → NIC → Help → Effective routes. For vm-win-spoke1 you should see:
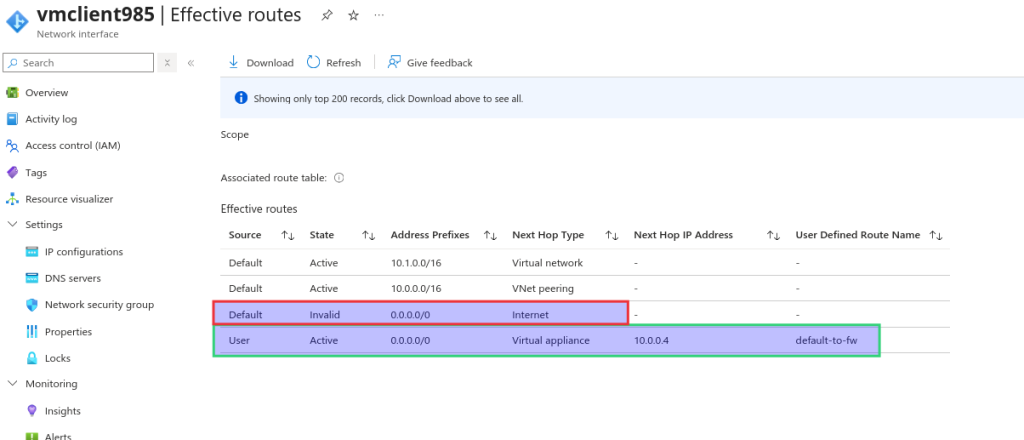
The user route overrides the system default route, so the system 0.0.0.0/0 entry appears as Invalid.
7.2 Verifying: Network Watcher Next hop
We can use a diagnostic tool that identifies the next hop type, IP address, and route table ID for a packet sent from a specific virtual machine (VM) to a destination IP address.
Network Watcher → Next hop, then select the VMclient and NIC, and set the destination IP:
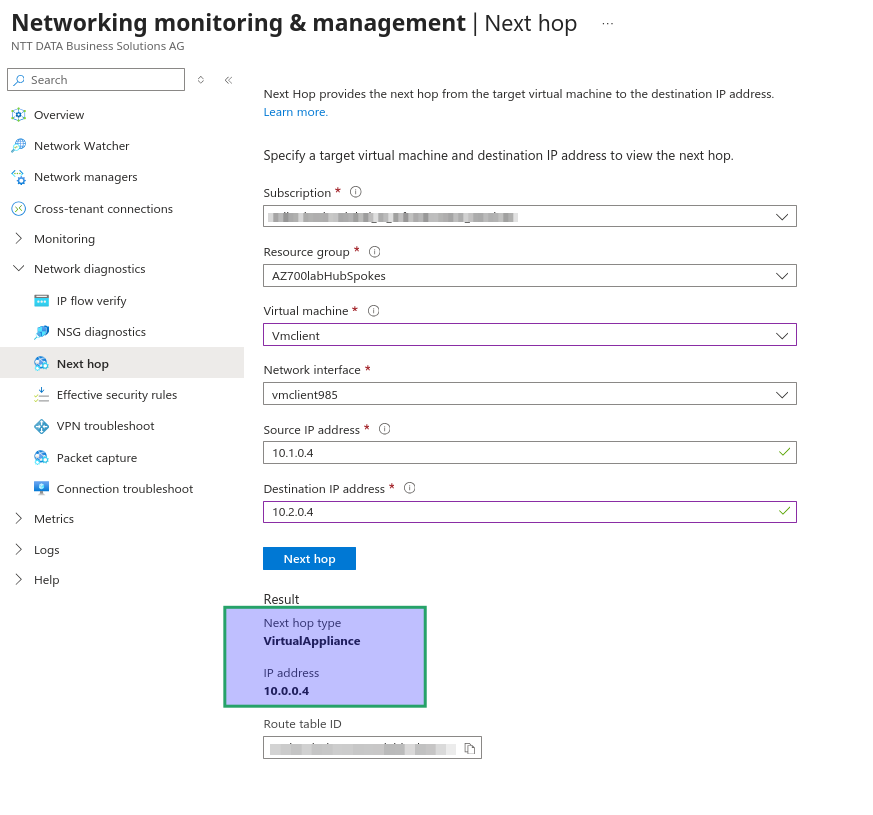
As you can see, vmclient send the packets to the hub firewall when it wants communicate with the Linux server.
8. Testing the firewall policy
With the rules from policy1 in place, we now validate each rule collection: DNAT, network and application. Each test also proves that the firewall is truly in the traffic path.
8.1 DNAT rules: administrative access
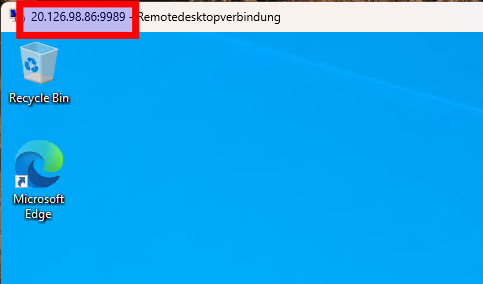
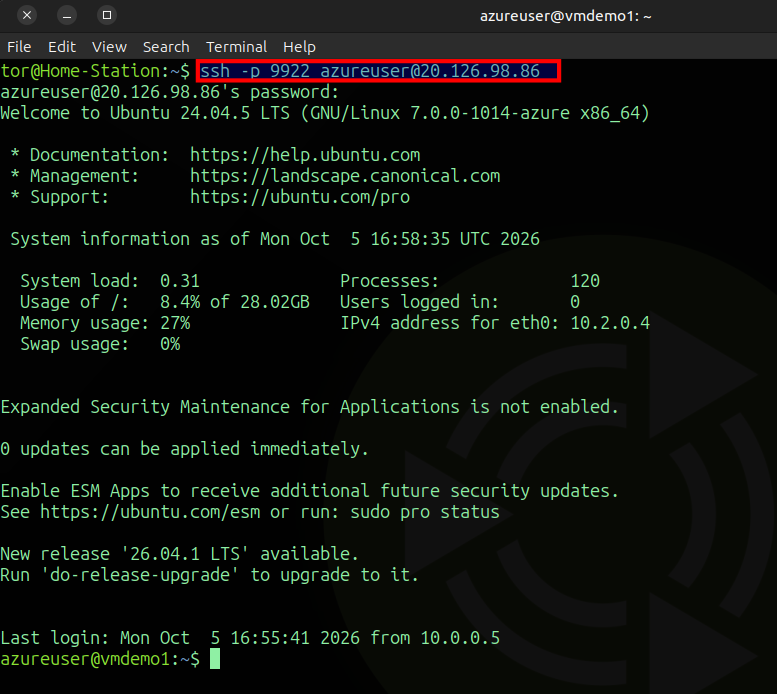
Inbound internet connections can go through the public IP of the firewall (fwpip) and are translated by the DNAT rules.
vmclient over RDP:
Linuxserver over ssh:
8.2 Network rules
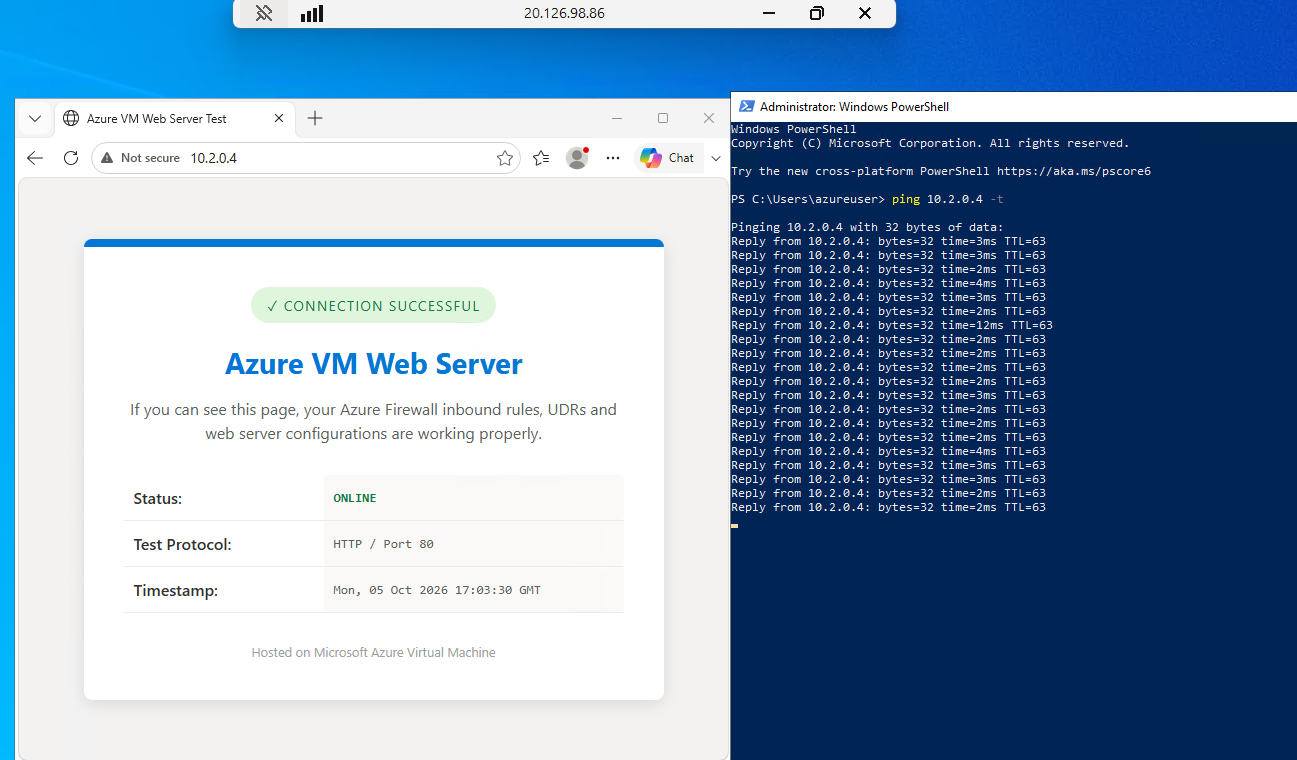
The vmclient reaches the web server even though the two spokes are not peered. The traffic follows this path: vmclient → UDR (0.0.0.0/0) → hubfw → network rule client-to-web → peering → linuxserver.
8.2 Application rules
From vmclient, open a browser and try to reach a website such as https://www.google.com.
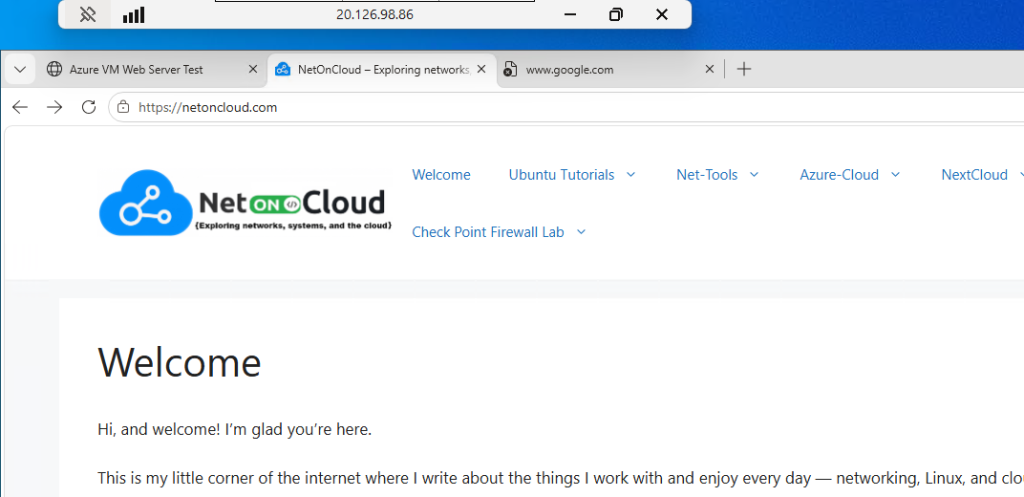
The request is denied. No application rule allows this destination, so the firewall’s implicit deny rule blocks it. Only Windows Update destinations (FQDN tag WindowsUpdate) ant the netoncloud site are authorized for this VM.
Test linuxserver authorized internet traffic (*.ubuntu.com) over the bash shell:
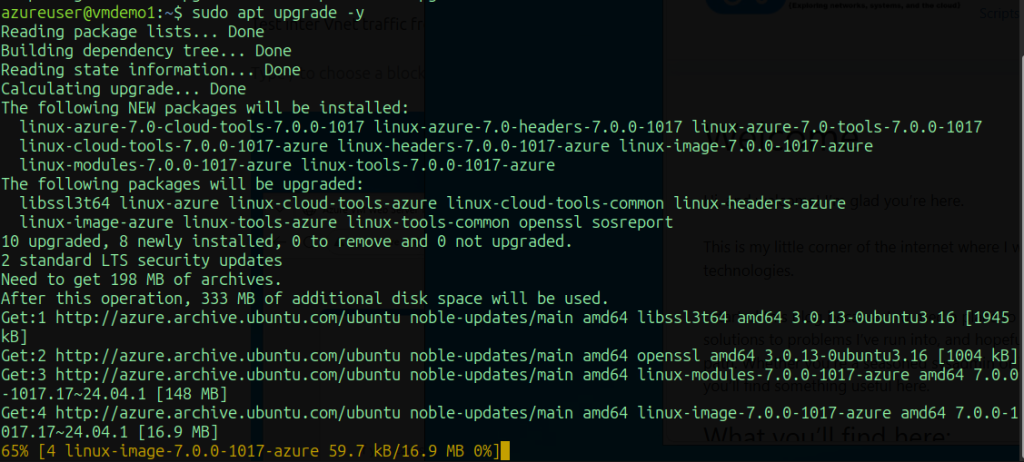
The Ubuntu repositories are reachable, while any other destination will be rejected.
9. Conclusion
This lab showed how a hub-and-spoke topology with a central Azure Firewall gives you a single point of control over every traffic flow in your network. By peering the spokes only to the hub and forcing 0.0.0.0/0 to hubfw with user-defined routes, the firewall sees and decides on inbound, outbound and east-west traffic. Peering alone would never have connected the two spokes: it is the firewall and the route tables that make inter-spoke communication possible, and only where a rule allows it.
Goals reached
| Goal | Result |
|---|---|
| Segment the network | One hub (HubVnet) and two spokes with non-overlapping address spaces, each workload isolated in its own VNet |
| Deploy with Infrastructure as Code | VNets, NICs and both VMs (Windows client and Linux server) deployed with an ARM template, with no public IP on the VMs |
| Build the hub-and-spoke connectivity | Two-way peering between the hub and each spoke, with forwarded traffic enabled |
| Deploy a central firewall | hubfw (Basic SKU) with a management NIC, managed by policy1 |
| Force traffic through the firewall | Route tables with 0.0.0.0/0 → 10.0.1.4 applied on both spoke subnets |
| Validate routing | Verified with Effective routes and Network Watcher Next hop instead of assuming it works |
| Publish VMs securely (DNAT) | RDP to the Windows client and SSH to the Linux server through the firewall public IP, restricted to a single source IP |
| Allow only the required east-west traffic (network rules) | The client reaches the private Linux web server over HTTP on port 80 and nothing else; DNS resolution handled |
| Restrict outbound traffic (application rules) | Internet access limited to Ubuntu repositories and Windows Update, everything else blocked by the implicit deny |
| Prove it with tests | Every rule collection tested, with successful and denied cases confirmed |
10: Cleanup (Important for Cost Control)
After completing the lab, it is recommended to delete the resources you created to avoid unnecessary charges and to keep your Azure environment clean. This step is especially relevant for exam labs and practice environments.
from Powershell run the command:
Remove-AzResourceGroup -Name AZ700labHubSpokes -ForceIt is the fastest and most common cleanup method and reflects real-world administrative practices.
To confirm the resource group has been removed:
Get-AzResourceGroup -Name AZ700labHubSpokesIf the resource group no longer exists, no output will be returned.
About the Author