
Introduction
If you have ever run low on disk space and had no idea what was actually taking it up, this script is for you. It scans a folder, finds the largest files inside it, and gives you a clean report — file name, location, size, when it was created, and when it was last accessed — without you having to right-click through File Explorer and wait for “Calculating size…” over and over.
Getting the Script
The full script is available to direct download on https://github.com/az104tor/findbiggest It requires PowerShell 7 and runs on Windows 10/11 and Windows Server 2019/2022. No external modules, no installation, only a ps1 file. Alternatively you can downloads a full local copy of my project git repository directly from PowerShell.
To install the PowerShell git modules launch it as administrator and run the commands:
Install-Module posh-git -Scope CurrentUser -Force
Install-Module posh-git -Scope CurrentUser -AllowPrerelease -Force # Newer beta version with PowerShell Core support
to clone on your local machine the findbiggest project:
git clone https://github.com/az104tor/findbiggest.gitPlease remember, that when a script is downloaded from the internet, user must unblock the file. Move to the Download directory and run:
cd findbiggest
Unblock-File -Path .\findbiggest.ps1
.\findbiggest.ps1  # run the script
If you get an execution policy error:
Set-ExecutionPolicy -ExecutionPolicy RemoteSigned -Scope CurrentUserWhat findbiggest does
By default, the script scans your user profile folder (C:\Users\YourName), since that’s usually where downloads, documents, and app data quietly pile up. You can point it anywhere else if you want to scan a different drive or folder.
A few things make it more useful than a basic file search:
- Skips the noise. Folders like temp caches,
node_modules, and.gitinternals are excluded by default, so you’re not wading through junk that isn’t worth cleaning up. - Fast scanning. Instead of PowerShell’s built-in recursive search, it uses
robocopyin “list only” mode under the hood — a much faster way to walk large folder trees without actually copying anything. - Live progress. While it scans, you get a running status update instead of a blank terminal wondering if anything is happening.
- Human-readable sizes. Results show in KB, MB, GB, or TB, whichever makes sense — no squinting at “40960.00 MB” when “40 GB” would do.
- Timed summary. The report tells you how long the scan took and how many files were checked in total.
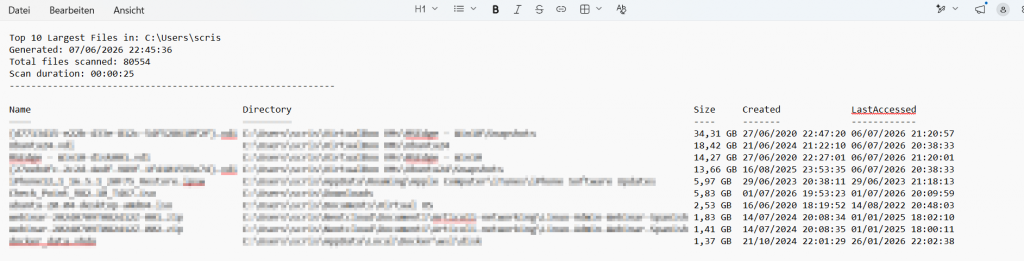
- Clean, ordered report. Everything is written to a text file with columns in a sensible order: Name, Directory, Size, Created, Last Accessed — and it opens automatically when done.
Usage
The script accepts 4 arguments (all optional, since each has a default value):
| Argument | Type | Default | What it does |
|---|---|---|---|
-Path | string | $env:USERPROFILE (your user profile folder) | The folder to scan for large files |
-Top | int | 10 | How many of the largest files to include in the report |
-OutputFile | string | $env:USERPROFILE\Desktop\LargestFiles.txt | Where to save the text report |
-ExcludeDirs | string[] | Temp, Packages, INetCache, CrashDumps, node_modules, .git | List of folder names/paths to skip during the scan |
Examples:
Run with no arguments to scan your user profile folder and report the top 10 largest files.
.\findbiggest.ps1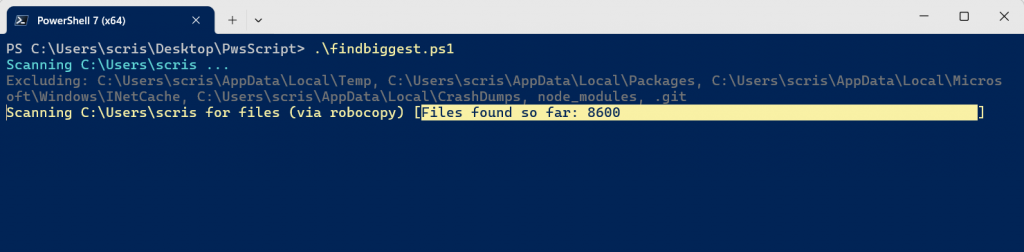

When it finishes, the report opens automatically in Notepad ( USERPROFILE\Desktop\LargestFiles.txt ) , and you’ll have a clear picture of exactly what’s eating your disk space — and where to go clean it up.
Run to Scan a specific folder or drive, change how many results to return, and set a custom output location:
.\findbiggest.ps1 -Path "D:\Projects" -Top 20 -OutputFile "D:\big-files-report.txt"Override the excluded folders entirely
.\findbiggest.ps1 -ExcludeDirs @("Desktop" "node_modules", ".git", "$env:TEMP")* Since -ExcludeDirs is an array, passing your own list replaces the defaults rather than adding to them — if you still want the built-in exclusions plus your own, you need to include them explicitly in the array you pass.
Conclusion
Disk space investigations don’t need to involve endless right-clicking and waiting on “Calculating size…” dialogs. With one script, you get a ranked, readable list of exactly which files are worth deleting, archiving, or moving to external storage — plus enough context (location, age, last use) to make a confident call instead of guessing.
About the Author