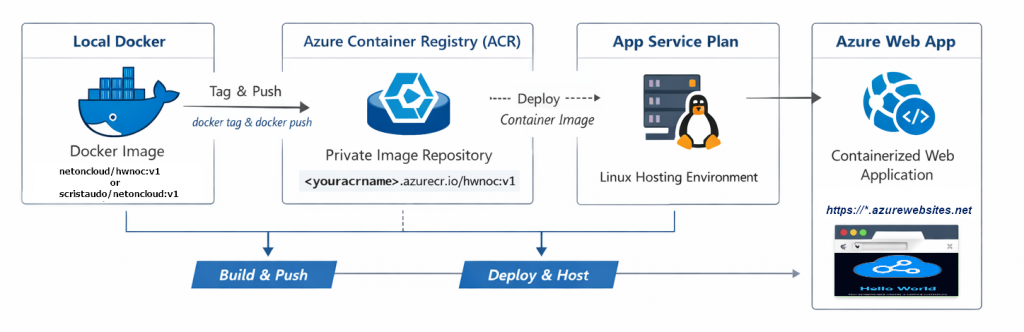
This tutorial demonstrates how to push the NGINX “Hello World” container image from our previous tutorial to Azure Container Registry (ACR) and deploy it as an Azure Web App. The main objective is to create an easy hands-on lab for the Azure AZ-104 certification. For this reason, I’ve minimized the complexity of operations and start from the Azure Portal to create the main resources.
“What you will learn”:
- How to create and configure Azure Container Registry
- How to authenticate Docker and push images to ACR
- How und Which App Service Plan to create for Linux containers
- How to deploy a container image to Azure Web App
- How to delete a resource group and its ihnerent resources from Poweshell
Prerequisites
Before starting, ensure you have:
- Completed the first tutorial or download the prebuilt image directly from my public hub docker repository:
docker pull scristaudo/netoncloud:v1- An active Azure subscription (free trial available)
- Azure PowerShell 7.0+ installed on Windows 10 or 11
- Docker installed and running
- Basic familiarity with Azure Portal
Introduction
Azure Container Registry (ACR) is a private Docker registry service that allows you to store and manage container images securely. Unlike Docker Hub (which is public by default), ACR provides:
- Private image storage with enterprise-grade security
- Native integration with Azure services like Web Apps, AKS, and Container Instances
- Geo-replication for global availability and disaster recovery
- Role-based access control (RBAC) for team collaboration and governance
- Vulnerability scanning and security compliance features (available in Standard and Premium SKUs))
For the AZ-104 certification, understanding ACR is essential as it’s a core component of Azure’s container ecosystem and represents modern application deployment patterns.
Step 1: Create Azure Container Registry Using Azure Portal
Recommended for labs is to organize all related resources in a dedicated resource group for easy management and cleanup.
From the Azure Portal, navigate to the left menu and click Create a resource
In the search box, type container registry and select Container Registry and then click Create.
Fill in the Basics tab:
- Subscription: Your subscription
- Resource group: select the one you created for this lab
- Registry name: Choose a globally unique name (e.g.,
netoncloud)- Must be lowercase letters and numbers only
- No special characters or hyphens
- Between 5-50 characters
- Location: Same as your resource group (e.g.,
West Europe) - SKU:
Basic(sufficient for this lab and AZ-104 exam scenarios)
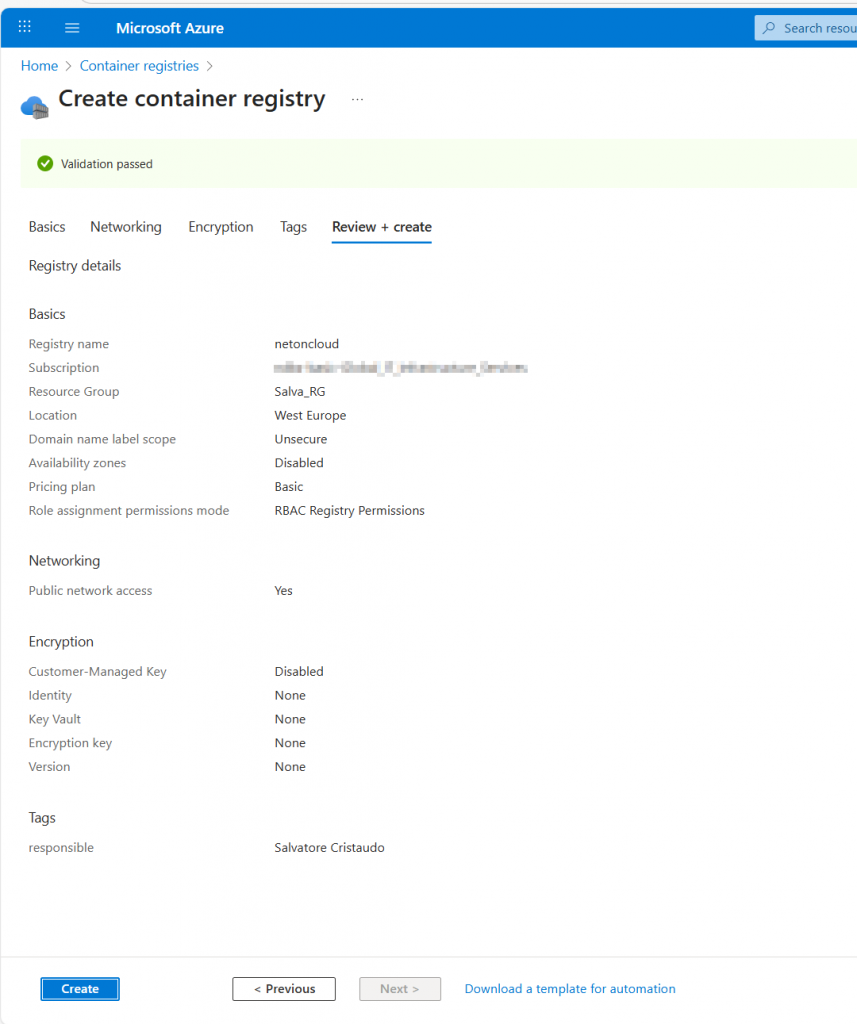
Official Microsoft Documentation: Quickstart: Create container registry – Portal
Enable Admin User Access
Once your ACR is created and available, we need to enable the Admin account for authentication from PowerShell.
- Navigate to your newly created Container Registry
- In the left menu under Settings, click Access keys
- Toggle Admin user to Enabled
Enabling the Admin user provides a username and password that can be used by Docker and App Services for authentication.
Note: This is not recommended for production environments (use the powerful Azure native IAM instead).
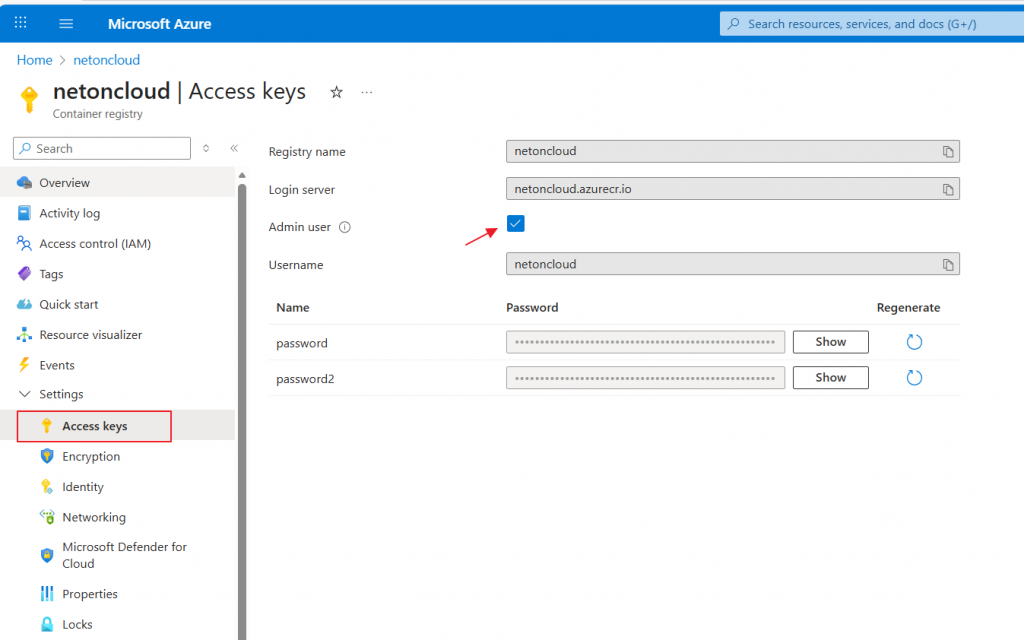
The Admin Username is always the ACR Name.
Step2: Tag and Push (upload) the container image to ACR
Now we are ready to upload the docker image from the local PC to the Azure Registry:
1.Login to the Azure Account from powershell:
Connect-AzAccount This command opens a browser window for authentication. Sign in with your Azure credentials. After successful authentication, you’ll see your subscription details in PowerShell
2. Authenticate Docker with your ACR using PowerShell:
Connect-AzContainerRegistry -Name "acrname"This command automatically handles the authentication between your local Docker and ACR using your Azure credentials.

3. Tag the local image to versioning it.
Before pushing to ACR, we need to tag the image with the ACR’s fully qualified name. This tells Docker where to push the image.
#if you download the image from my Docker repository
docker tag scristaudo/netoncloud:v1 <youracrname>.azurecr.io/hwnoc:v1

# if you followed my first tutorial (Step 4) you should have build the image "netoncloud/hwnoc:v1"
docker tag netoncloud/hwnoc:v1 youracrname.azurecr.io/hwnoc:v1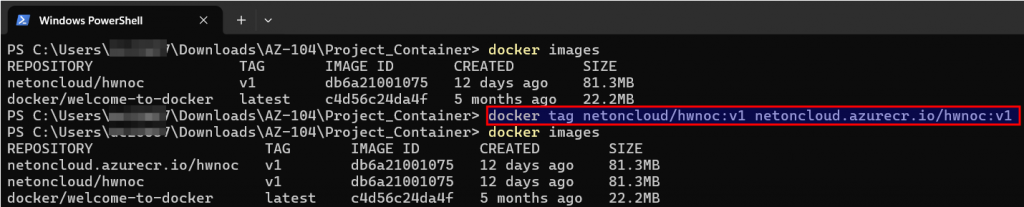
You should see both the original image and the newly tagged version pointing to the same IMAGE ID because Tagging an image does not duplicate it. It creates a reference that tells Docker which registry to push to.
4. Upload the tagged local image to your ACR
docker push netoncloud.azurecr.io/hwnoc:v1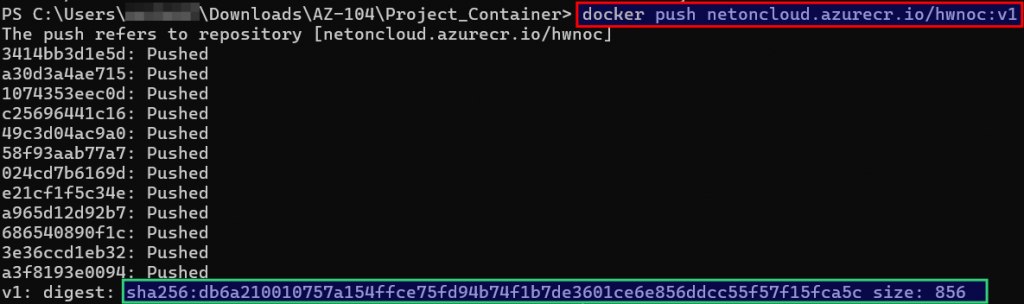
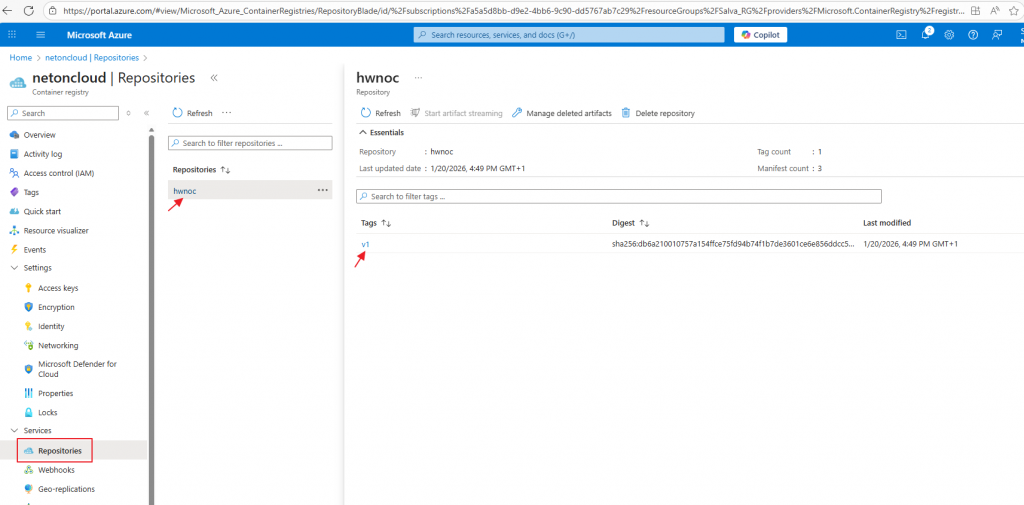
5. Verify the Image in ACR from Azure Portal
- Navigate to your Container Registry in the Azure Portal
- In the left menu under Services, click Repositories
- You should see your repository:
hwnoc - Click on the repository name to view tags
- You should see the
v1tag listed with:- Digest: A unique SHA256 hash identifying this exact image version
- Size: The compressed size of the image
- Last updated: Timestamp of when it was pushed
Compare the digest hash shown in the portal with the digest from your PowerShell output during the push. They should match exactly.
AZ-104 Exam Tip: Understanding image digests is important. Unlike tags (which can be overwritten), digests are immutable identifiers. In production, you can reference images by digest for guaranteed consistency: youracrname.azurecr.io/hwnoc@sha256:abc123...
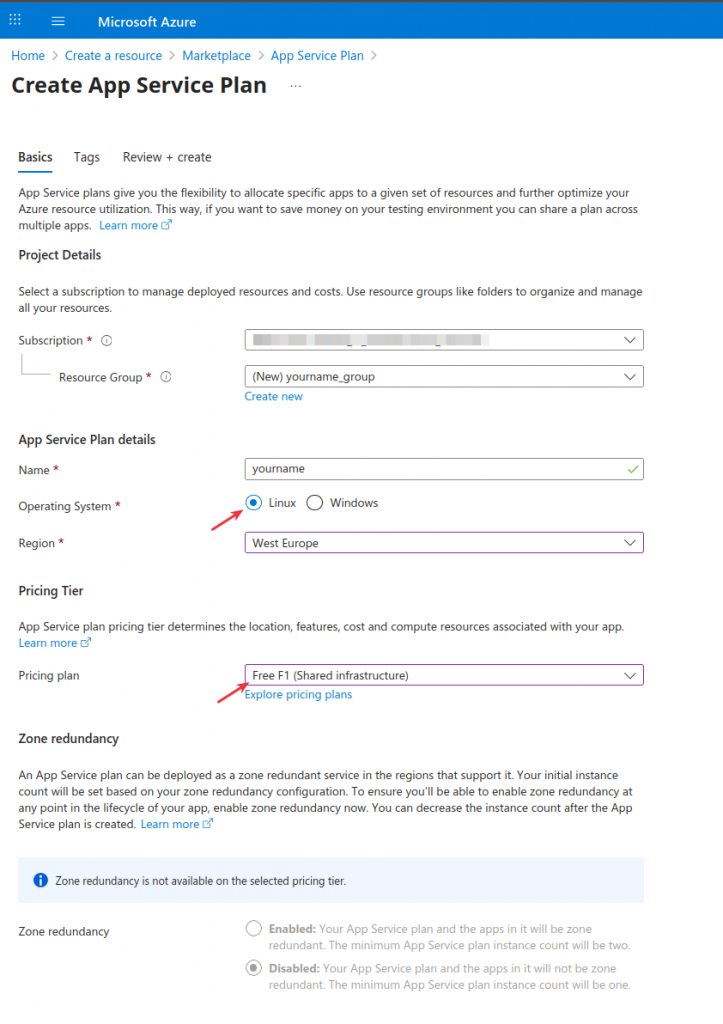
Step3: Create an azure ASP
An App Service Plan defines the compute resources (CPU, memory, features) that will run your web application. Think of it as the “hosting server” specification.
Official Microsoft Documentation: Azure App Service Plans
From the Azure Portal, navigate to the left menu and click Create a resource
In the search box, type app service plan and select App Service Plan and click Create
Fill in the configuration:
Subscription: Your subscription
Resource group: same as your ACR
Name: your-asp-name
Operating System: Linux (required for this container deployments)
Region: Same as your ACR (e.g., West Europe)
Pricing Tier: for this lab, select Free F1: No cost, limited resources (1 GB RAM, 60 CPU minutes/day). This Tier is sufficient for this lab but does not support scaling or production workloads.
Step4: Create the Web App
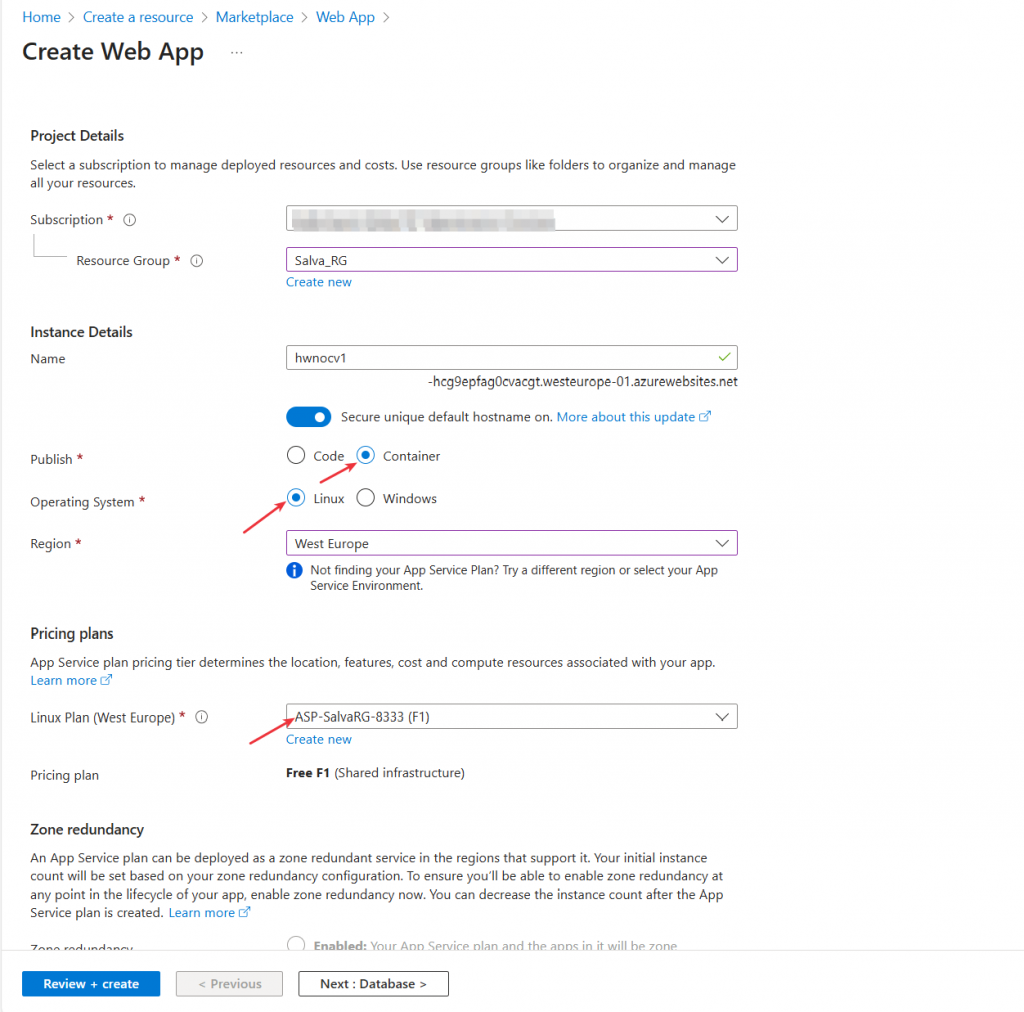
From the azure portal navigate to the left menu and click “create a resource“. In the search box type web app and create the resource like below:
Fill in the following information:
- Subscription: Your subscription
- Resource group:
same as your acr - Name: Choose a globally unique name (e.g.,
hwnoc)- This becomes your URL:
*.azureregion.azurewebsites.net
- This becomes your URL:
- Publish: Docker Container
- Operating System: Linux
- Region: Same as your other resources (e.g.,
West Europe) - App Service Plan: Select the plan you created before
Next, the container tab this is where you connect your Web App to your ACR image.
- Image Source: Azure Container Registry
- Registry: Select your ACR (e.g.,
netoncloud) - Image: Select
hwnoc(your repository) - Tag: Select
v1 - Authentication: Admin Credentials
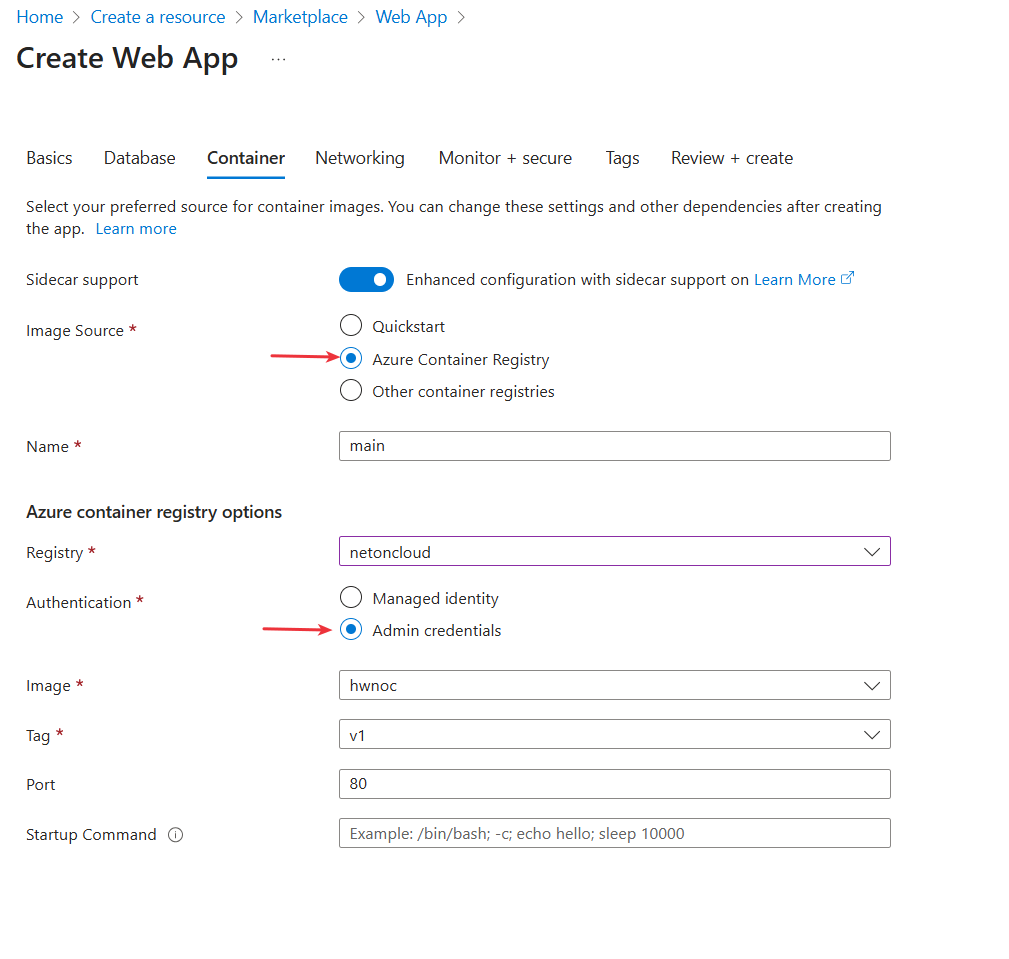
Azure automatically retrieves your ACR admin credentials and configures the Web App to authenticate and pull the image.
*AZ-104 Exam Tip: In production scenarios, you would use Managed Identity (IAM) instead of admin credentials. This provides better security by eliminating stored credentials. However, for the exam and labs, admin credentials are acceptable.
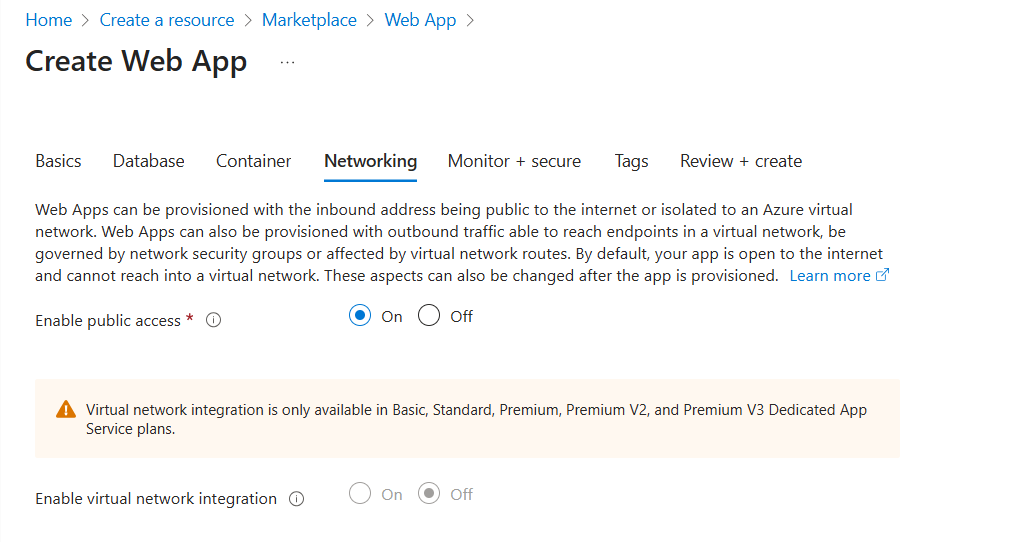
On the Networking Tab let enable public access “on”:
Complete to create the web app with the default Monitor + secure configuration.
Step5: test the Web App
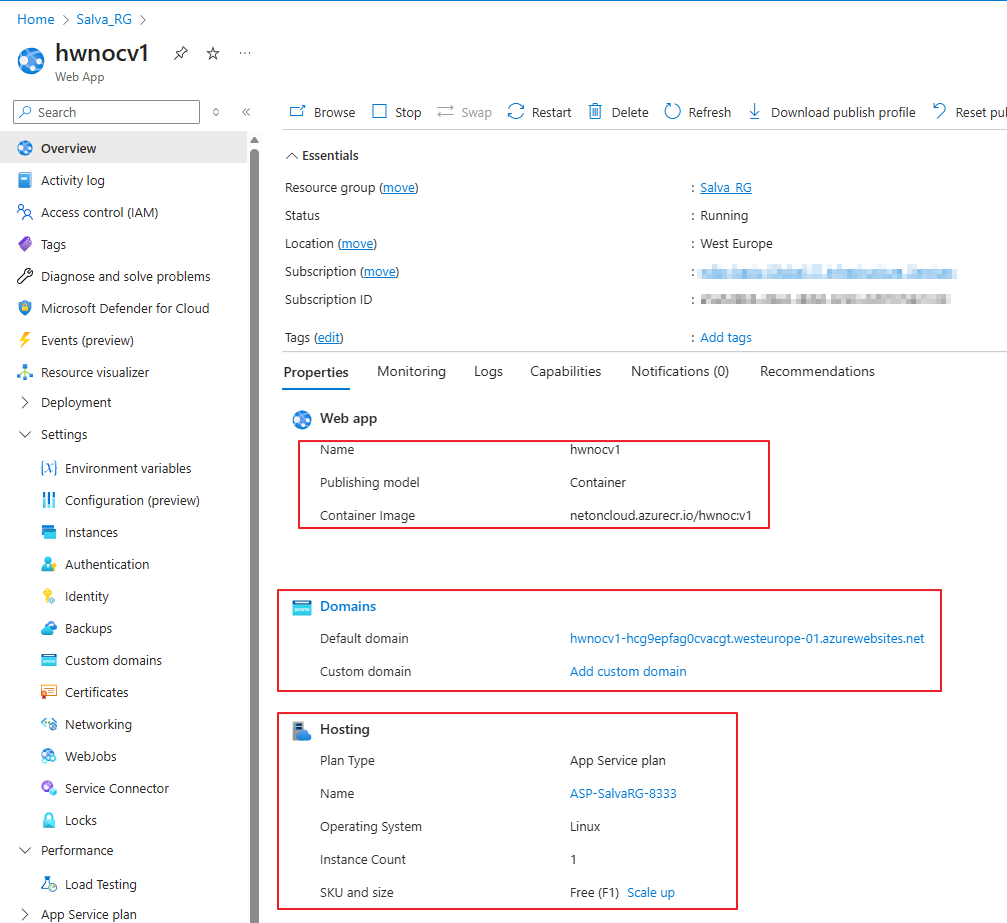
Access the Web App Overview
- Once deployment completes, click Go to resource
- You’ll see the Web App Overview page with important information:
Key information displayed:
- Default domain: Your public URL (e.g., hwnoc-d2ecf3cwgybce3g0.westeurope-01.azurewebsites.net)
- Status: Should show “Running”
- Container image:
netoncloud.azurecr.io/hwnoc:v1 - App Service Plan: your app service plan name
- Location: Your selected region
You can map an existing custom Domain Name System (DNS) name to App Service. Take in mind that the plan must be a paid tier, not the Free (F1) tier. Official Microsoft Documentation: Set up an existing custom domain name for your app – Azure App Service | Microsoft Learn
Test the Application
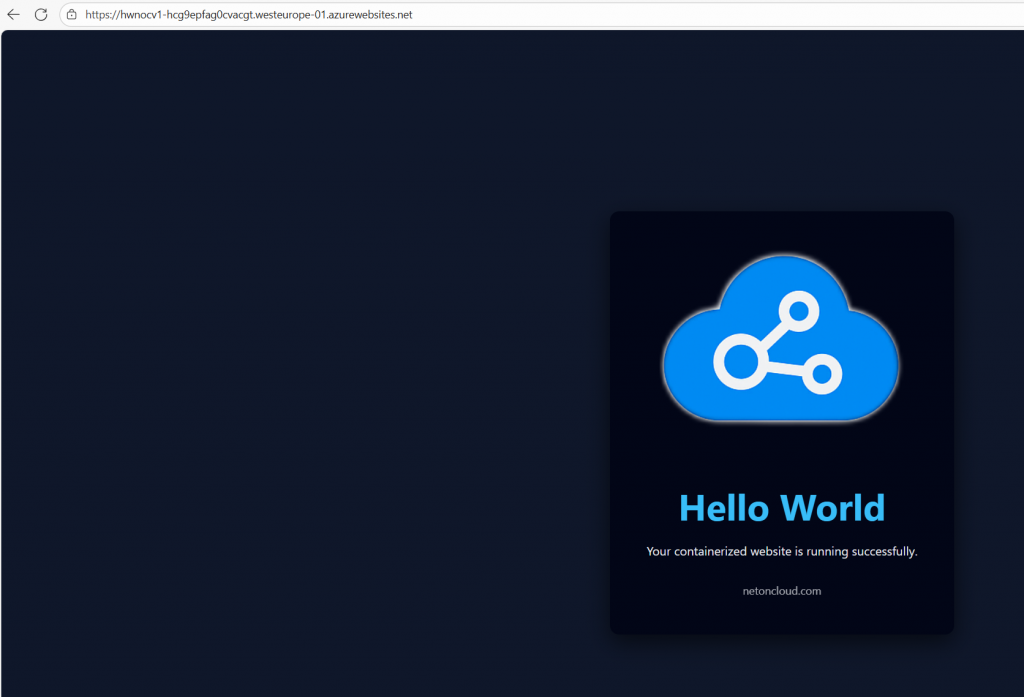
From the Overview page, copy the Default domain URL. Then, open your preferred web browser and paste it there.
In my case: https://hwnoc-d2ecf3cwgybce3g0.westeurope-01.azurewebsites.net
You should see your “Hello World” containerized website running successfully!
If the site does not load immediately, wait 1–2 minutes and refresh. Container startup can take additional time on Free plans.
Go to the App service Plan to visualize your Web Apps:

Step 6: Cleanup (Important for Cost Control)
After completing the lab, it is recommended to delete the resources you created to avoid unnecessary charges and to keep your Azure environment clean. This step is especially relevant for exam labs and practice environments.
After the Azure login (see above), from Powershell run the command:
Remove-AzResourceGroup -Name "your-resource-group-name" -ForceIt is the fastest and most common cleanup method and reflects real-world administrative practices.
To confirm the resource group has been removed:
Get-AzResourceGroup -Name "your-resource-group-name"If the resource group no longer exists, no output will be returned.
Conclusion
Container technology represents the modern standard for application deployment, and Azure provides a comprehensive platform for running containerized workloads at any scale. By completing this lab, you’ve taken an important step in understanding how organizations modernize their infrastructure and deliver applications in the cloud. In this lab, you completed the following tasks:
- Created and configured Azure Container Registry
- Authenticated Docker and pushed container images to ACR
- Created an App Service Plan for Linux containers
- Deployed a containerized application using Azure Web App
- Clean-up lab environment using PowerShell
These skills are core to the AZ-104: Microsoft Azure Administrator certification and reflect real-world administrative responsibilities.

Author Biography
“I am an experienced Network and Cloud Administrator, specializing in the design and operation of secure, high-availability infrastructures. With professional certifications in Cisco Switching and Routing (CCNA, CCNP) and Check Point Firewall Administration (CCSA), I bring in-depth expertise in network security and SAP connectivity solutions for customers and partners over dedicated VPN tunnels.
I am skilled in managing hybrid cloud environments, firewall policies, routing technologies, and SAP network infrastructure. I have developed strong analytical skills in troubleshooting and supporting organizational IT growth on a global scale. I am currently employed by a leading Japanese multinational in the IT and telecommunications industry.”